Back
Back
Back
Back
Back
Back
Back
Back
Back
Back
USA & Canada


Preparation
Preparing Siding Before Finishing
Good surface preparation practices are essential to achieve a durable, long-lasting exterior finish. Most premature exterior coating failures are attributable to inadequate surface preparation resulting in:
- poor finish coat adhesion
- surface discoloration
- lack of finish coat uniformity (sheen, color and surface hiding)
- lack of corrosion resistance
The first step in surface preparation is to inspect the surface and make any necessary repairs. The surface must then be cleaned to be free of all dirt, mildew and loose material.
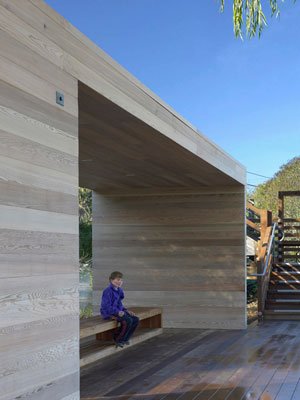
New (not weathered) Western Red Cedar
New cedar siding and trim should be protected from the weather before, during and after construction. It is seldom necessary to carry out extensive surface preparation providing the wood has not weathered for more than two weeks and is clean and dry. The moisture content should always be checked as a precaution. The moisture content cannot be above 20% and if the wood has been contaminated by dirt, oil or other foreign substances, the contaminants must be removed.
Dirt should be washed from the surface (see section on cleaning and discoloration). For smooth-planed, flat-grained cedar, some surface preparation may be desirable. On flat grained wood, the surface should be scuff-sanded with 50-60 grit sandpaper. This procedure will greatly increase the coatings performance but will not detract from a smooth appearance. Surface preparation is not necessary for clean textured cedar.
Acrylic-Based Stains
Applying Paint and Solid Color Stains
Exterior Western Red Cedar surfaces only need to be refinished when the old coating has worn thin and no longer affords the wood protection. In refinishing painted or solid-color stained siding and trim, removal of the old coating may be required. This is necessary if, for example, the old finish is severely cracked or is peeling. These finishes can be removed by a variety of procedures, all of which can be difficult, time consuming and expensive processes. Some of these procedures can damage the wood. For example, power washing should never be used for removing coatings from Western Red Cedar because this process can severely damage the wood surface fibers and make it difficult for the next finish to adhere properly.
Using Solid Colored Finishes
Western Red Cedar that has been finished with paints or solid-color stains is best refinished with the same type of finish originally applied. Remember, that proper surface preparation and cleaning before refinishing are essential for optimal performance of the new finish coat or coats.
Important Note: Old latex coatings should always be refinished with latex coatings and never with oil-based coatings. Old oil-based finishes can be refinished with latex finishes only when the old oil-based finish has been properly cleaned and a primer coat applied first.
To refinish the old surface, first scrape away all loose, cracked or peeling finish. Sand the bare wood and any remaining finish to “feather” the edges smooth with the bare wood. Mildew must be killed and removed before Western Red Cedar is refinished, or the mildew will grow through the new paint coat or solid-color stain. Removal can be done with a commercial mildew remover or with dilute solutions of liquid household (oxygen based) bleach followed by thorough rinsing with clean water. After these preparations, scrub the surface with a stiff bristle (not wire) brush and water, and rinse with clean water. Allow the washed surface to dry before recoating and apply primer paint to areas of bare wood. After the primer has dried, apply one or two topcoats of paint or solid-color stain. Two topcoats are always better over bare wood that has been primed.
These may be applied to Western Red Cedar by brush, roller, or pad. Brush application is usually the best. These stains perform similarly and are applied like paint. One coat of solid-color stain is only marginally adequate on new wood. A prime coat with a top coat will always provide better protection to the wood as well as promoting a longer service.
Optimal performance can be obtained if the wood is primed, then given two coats of stain. Top coats of acrylic latex solid color stains are generally superior to all others, especially when two coats are applied over a primer. Unlike paint, a solid-color stain may leave lap marks. To prevent lap marks, follow the procedures suggested for semi-transparent penetrating stains.
Oil-Based Stains
Applying A Transparent/Semi-Transparent Finish & Bleaching Oils
Oil & Water Repellent Stains
Oil finishes and water-repellent preservatives can be renewed by a simple cleaning of the old surface with a stiff bristle (non-metallic) brush and water followed by an application of a new coat of finish. In some cases, a mild scrubbing with a detergent followed by rinsing with water is appropriate. In more drastic cases, mildew cleaners must be used. The second coat of water-repellent preservative will last longer than the first because more can be applied as it penetrates into small surface checks which open as the wood weathers. The rougher the surface, the more finish can be applied, and the longer the service life.
Semi-transparent oil-based penetrating stains are relatively easy to refinish. Excessive scraping and sanding are not usually required. Simply use a stiff bristle (non-metallic) brush to remove all surface dirt, dust, and loose wood fibers. Following proper cleaning to kill mildew contamination, apply a new coat of stain. The second coat of penetrating stain often lasts longer than the first coat because more can be applied as it penetrates into small surface checks.
Important Note: Steel wool and wire brushes should never be used to clean Western Red Cedar. Metal deposits can react with chemicals naturally occurring in the cedar to yield dark blue-black stains on the surface.
Latex and Oil Semi-Transparent Stains
You have the option to apply semi-transparent stains by brush, spray, pad, or roller. Brushing will usually give the best penetration and performance. Spray or roller application followed by back-brushing is also an acceptable method of application. Oil-based stains are generally thin and runny, so application can be messy.
Lap marks can be prevented by staining continuous lengths. This method prevents the front edge of the stained area from drying before a logical stopping place is reached. Working in the shade is desirable because the drying rate is slower. Stain that has been applied by spray, without back-brushing, is prone to show blotchy patterns as it weathers.
Two coats of penetrating oil-based stain on textured Western Red Cedar will provide a longer service life than one coat, but only if the wood will accept the second coat. Stir the stain thoroughly during application to prevent settling and color change. Avoid mixing different brands or batches of stain.
Latex semi-transparent stains do not penetrate the wood surface, but they are easy to apply and less likely to form lap marks. These stains are film-forming and may not be as durable as oil based stains.
The surface condition of the wood on which the finish is applied can substantially affect the performance and life expectancy of the finish.
Bleaching Oils
Weathering stains and bleaching oils are refinished the same way as the semi-transparent oil based penetrating stains. Semi-transparent latex stains act more like very thin paints and may require more extensive surface preparation (scraping, sanding, etc.) before being refinished. Care should be taken not to build-up the film thickness by recoating too frequently. Manufacturers’ instructions should be followed carefully.
The application of a finish on Western Red Cedar is as important for durability and optimal performance as is the finish-substrate combination chosen for the job. Finishes can be brushed, rolled, sprayed or applied by dipping. The application technique, the quality and quantity of finish applied, the surface condition of the substrate, and the weather conditions at the time of application can substantially influence the life expectancy of the finish. The application guidelines suggested here should be followed in combination with the manufacturer’s preparation and application recommendations for the product.
Finishes and cleaners are chemicals which may pose health hazards from contact, ingestion or by inhaling. So be sure to carefully read the all of the manufacturers’ application instructions and warnings prior to purchasing the product.
Natural Weathering
Letting Western Red Cedar Weather Naturally
Uncoated, weathered Western Red Cedar siding or trim can often be restored to its original color by applying commercial products called cleaners, brighteners or restorers. Although intended primarily for restoring horizontal wood surfaces such as decks, these products generally work almost as well on vertical surfaces. Some products are formulated with thickening agents to help the liquid cling better to vertical surfaces.
Western Red Cedar performs satisfactorily as a decking and siding product if it is left unfinished to weather naturally.
You may choose this option due to:
- A preference for the silvery grey look of naturally weathered Western Red Cedar;
- A desire not to invest the time and effort required to maintain the finish on a cedar product;
- Project inaccessibility, causing difficulty in maintaining the finish on a Western Red Cedar project, for example, siding on very tall buildings; or,
- A concern about the environmental impact of applying a finish on your Western Red Cedar.
These are all valid considerations and the reality is that Western Red Cedar siding and decking can have a long service life without a finish coating in many environments – as long as good design, installation and maintenance practices are followed.
It is important to understand that the choice not to apply a finish to your cedar product has long-term implications. This choice requires advance consideration before you allow natural weathering to begin. As Western Red Cedar weathers, it will lose its natural color and become grey. In very dry climates, it weathers to a silvery grey color, but in most other climates, because of varying moisture and sun exposure conditions, the Western Red Cedar does not weather uniformly and is likely to develop a dark, blotchy, grey appearance.
Should you wish to restore weathered cedar to a state where it can be painted or stained however; significantly more effort will be required to prepare the surface of the wood for coating. If a truly uniform grey appearance is desired, then this effect can be achieved by the use of a commercially prepared bleaching oil or grey weathering stain. This is essentially a water-repellent finish containing pigments and other additives which is most effective on textured cedar. To maintain this look, the bleaching stain may have to be re-applied periodically.
 Although the natural weathering effect is usually only “skin deep” (less than 1-2mm), with the cedar largely unchanged beneath, extra care must be given to the design of the project, the installation of the cedar and routine maintenance. Without the protection provided by a coating against moisture intrusion, (especially end grain sealing), steps must be taken during the installation process to allow Western Red Cedar to readily dry following exposure to moisture, otherwise the risk of decay increases.
All cedar products used in exterior applications require a degree of maintenance to keep them looking their best. Even if the choice is made not to apply a finish to Western Red Cedar, contaminants such as dirt and mildew should be regularly removed to maintain its beautiful, natural appearance.
Environmental Product Declarations of Western Red Cedar siding and decking shows it has the most benign environmental impact of all the alternative product choices for those building applications. Coatings, especially the solvent borne finishes and the frequency of their application negatively impact the LCA of cedar siding and decking. This impact may influence a decision not to apply a finish. Fortunately, a new generation of more environmentally friendly, water borne, coatings are emerging and these products should be considered.
1Life Cycle Assessment (LCA) is used to assess the environmental performance of a product from cradle to grave.


