
Our four step-by-step video guides take the guesswork out of installing the most popular Real Cedar siding profiles—Tongue & Groove, Shiplap, Bevel, and Board & Batten. Each tutorial covers the essential tools, techniques, and tips you need for a polished, professional result. Whether you’re a seasoned pro or a hands-on homeowner, these videos will help you bring the natural beauty of Western Red Cedar to your next project.
Flashing Installation
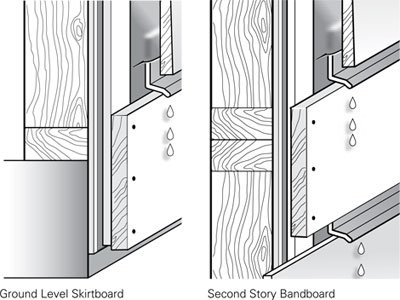
Before installing siding, make sure that flashings are installed to prevent moisture from entering wall and roof spaces. Flashing is an important line of defense in controlling moisture in wall assemblies. Flashing intercepts and directs the flow of water away from the building to designed drainage paths. Install horizontal flashing extending from the top of all wall penetrations (ie all windows and doors) and at any material or material directional change (ie. bandboards, water tables or the introduction of any alternative material). The flashing should tilt downward to allow water to drain away from the wall. Siding or trim should be ¼ inch above the flashing ledge. Do not caulk where the flashing and trim or other materials meet. Note that caulking in lieu of flashing is not acceptable.
Door and Window Flashing
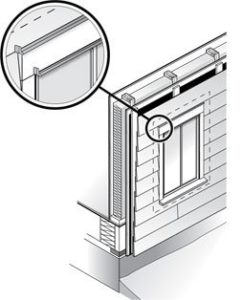 The purpose of flashing window and door headers is to intercept water behind the siding and direct it to the outside, and to redirect water flowing down the face of the wall to flow away from the wall opening.
Moisture can accumulate behind the siding as a result of:
- rain penetration through the siding;
- water vapor diffusion;
- leakage of moist air from the interior or condensation.
Some moisture will drain through the weepholes at the bottom of each piece of siding. An additional head trim flashing is required at the head of the window/door to direct water further outward, beyond the thickness of the window
Skirt and Bandboards
Fascia Flashing
The purpose of fascia flashing is to support the shingle edge and to provide a drip edge to prevent water from running back underneath the roofing shingles and down along the fascia and soffit.
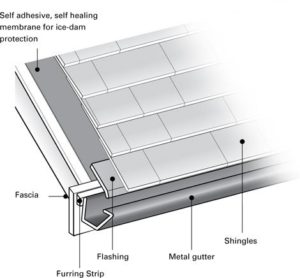
Preformed eaves flashing/drip edge should be installed under the starter course of the shingle roofing. The extension of flashing supports the edge of shingles. If eaves troughs (rain gutters) are used, the flashing edge also helps to direct the water into troughs. Fascia flashing protects both the soffit and the fascia board, and provides a drip edge at the bottom edge to direct water away from the building.
Caulk Usage
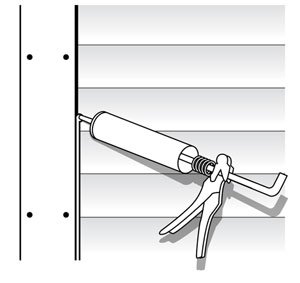 Use high-performance acrylic-latex, acrylic, acrylic-silicone, polyurethane, polysulfide or terpolymer rubber caulks or sealants to seal gaps around windows, doors, corners, and other exterior joints that are exposed to potential water intrusion. Pure silicone and clear caulks do not work well on Western Red Cedar and are not recommended. Caulking is not a permanent solution and as such requires regular maintenance. If not inspected and maintained, caulking may fail and trap water, creating severe moisture problems. Do not rely on it as the only barrier to moisture penetration. Do not caulk areas that will prevent moisture from escaping the wall cavity (e.g., under windows and around flashing).
Roof & Ground Clearance
Siding and Trim that extends down to a roof (dormers, second floors, etc.) and decks requires a minimum of a 2 inch gap to avoid wicking. Trim, such as water table or skirt boards must be a minimum of 6 inches above the grade.
Installing Corners and Field Joints
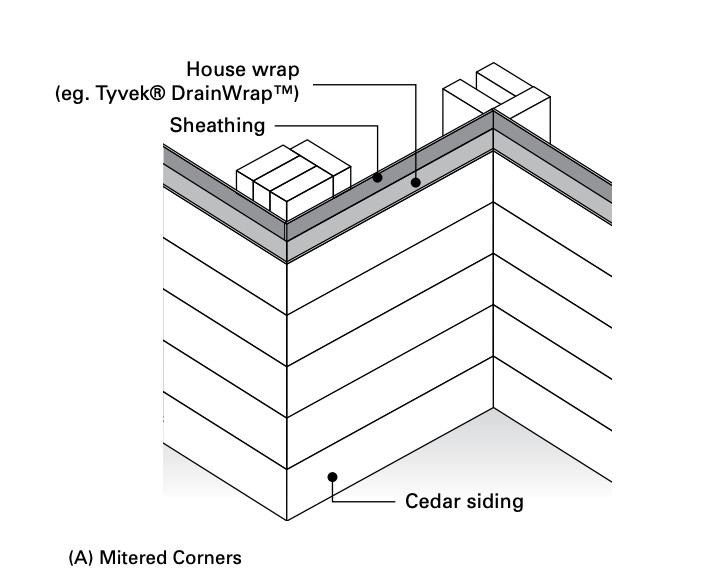
There are two main methods used for outside corners. The choice depends primarily on the desired appearance but also the experience and skill of the installer. Mitered corners offer a professional looking finish. They are most commonly used with horizontally applied siding applications such as bevel. Mitered corners require good carpentry skills. They must fit tightly for the full depth of the miter.
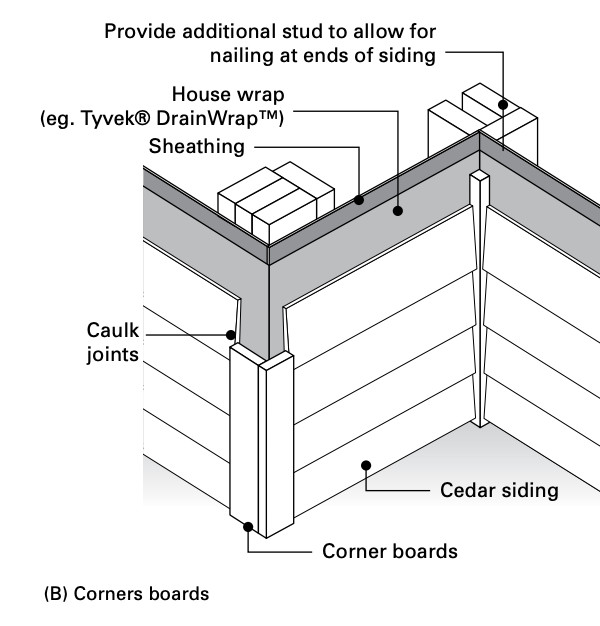 Corner boards are a popular and easier alternative to mitered corners. Thickness of the corner board will depend on the thickness of the siding. The most common are 3/4 inch or 1-1/4 inches thick. Width is a matter of taste and proper proportion. Corner boards are applied to the sheathing with siding fitting tightly against the narrow edge of the boards, allowing for expansion and an adequate caulking bead. The corner boards and the ends of the siding are nailed to the corner studs which anchors the wood for a maintenance-free joint. Designing roofs with an eaves overhang to protect corners from weathering also helps ensure trouble-free joints. Always apply primer or stain end cuts. With corner boards, there is the choice of applying them next to the siding or over top of the siding as shown here.
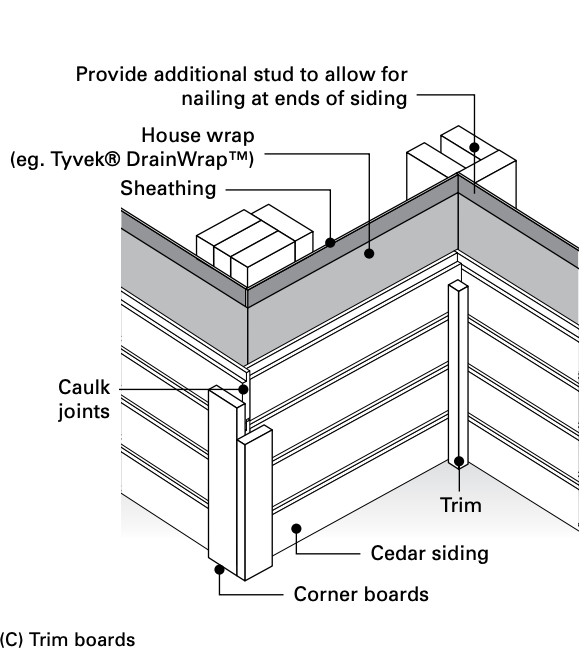 As in the above illustration, at inside corners, siding is frequently butted against a 2 x 2 trim strip. It can also be butted against adjoining walls with a trim strip used to cover the joint.
Field Joints
When butt jointing siding, cut ends at 45 degree angles to form an overlapping joint. This is particularly important for vertical installation. Ensure joints meet on studs, blocking or furring strips with the nail penetrating solid wood at least 1-1/4 inches.
All installers should learn and follow “best practices” in order to deliver a better job for their customer and reduce call backs.