
Pre-Building Recommendations for Siding


Initial Inspection
Material Inspection
Always purchase recognized grades such as those from WRCLA members and ensure you understand the grade of material you’ve purchased. Grades are designed for specific appearances and uses. Before installing, be sure the siding you’ve selected meets your requirements. Any product found to be damaged or visually unacceptable for any reason should not be installed; if you encounter any such product STOP and call your supplier immediately.
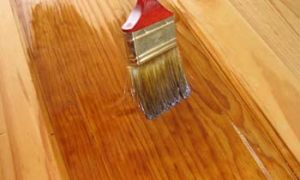
Priming
Prime Before Installing
After cedar has achieved equilibrium moisture content and before it is installed, a coating on all surfaces is recommended. The type of coating will vary with final finish selected. The coating protects the wood from water penetration, helps prevent staining caused by mildew and extractives and can increase the service life of top coats. The following coatings have proven themselves in field testing (see table below).
 Check with your paint dealer to make sure that the prefinish coat you select is compatible with the intended finish coat. For example, clear water repellants should not be used where the intended finish is a bleaching oil.
Recommended Priming Procedures for Cedar Siding
| Type of Finish Coat | Recommended Priming Coat |
|---|---|
| Natural and semi-transparent stains | Coat all surfaces with the stain |
| Solid color stains and paints | Coat all surfaces with an alkyd oil stain-blocking primer. Alternatively, use a clear water repellant on back of siding and the primer on face and edges |
| Bleaching Oils | Prime all surfaces with a coat of the bleaching oil |
Acclimation
How to Acclimatize Siding
One of the most stable softwoods, Western Red Cedar is nevertheless a natural material and it responds to the environment. Cedar siding can swell or shrink as it gains or loses moisture to reach equilibrium with the moisture content of the surrounding air. Ensuring that the moisture content of cedar siding is at equilibrium before it is installed will minimize movement later on. Recommended moisture content for sidings used in various regions of the country are given in the table below. On the job site, keep the wood dry. Stack siding off the ground and under cover. If the wood is to be stored over damp ground or new concrete, place a moisture barrier under the siding. Siding should be 4″ to 6″ (102-152mm) above the ground with air circulating freely around and throughout the stack. Acclimatization time varies with the moisture content of the siding. The following procedures are suggested for different siding specifications.
Job Site Storage
 Until installed, Western Red Cedar siding needs protection from direct sunlight, water saturation, snow, ice, dirt, and other elements. Store the siding flat and off the ground on stickers and a vapor barrier so that moisture is not absorbed through the bottom boards of the stack. Protect with a waterproof covering elevated in the center so that water does not pool on the cover. Do not completely seal the bundle, as good air circulation is required. Ideally, the siding should be stored in an enclosed building such as a garage prior to use.
Green Siding or Kiln Dried
Purchasing Siding – Kiln Dried vs Green Siding
Kiln Dried Clears
These have been dried at the mill to 12-15% moisture content. They are the most ready-to-use of all siding products. If the siding has not been wetted prior to arrival on the job site it may be applied upon arrival except in the Southwest where 3 to 5 days of well ventilated storage is generally required. If the siding has been wetted it must be separated and allowed to dry thoroughly before installing.
Dry Knotty Sidings
Knotty sidings are air or kiln dried to less than 19% moisture content. Stack the siding on evenly spaced, vertically aligned stickers (figure below) in a dry storage area for 7-10 days. More time may be required in damp or humid conditions.
Green (Unseasoned) Sidings
Unseasoned or green sidings have not been dried prior to delivery and require a longer time to acclimatize than seasoned sidings. Separate the siding with vertically aligned stickers (figure on right) and store in a well ventilated dry location for a minimum of 30 days or longer in damp or humid conditions. If specifying unseasoned siding, patterns such as channel, bevel and board-and-batten are recommended since these allow for shrinkage. Narrower widths are also recommended since these move less overall than wider widths. Recommended Moisture Content for Siding Installation
| Most Areas | Dry, Southwest States | Damp, Warm Southeastern Coastal Areas | |||
|---|---|---|---|---|---|
| Average | Individual Pieces | Average | Individual Pieces | Average | Individual Pieces |
| 12% | 9 – 14% | 9% | 7 – 12% | 12% | 9 – 14% |
- To calculate average, test 10% or more of pieces.
- Source: Wood Handbook 1987.
Available from our Premium Retailers


