Build your own little cabin in the woods


photos by Chris Campbell
Treat summer guests to comfortable quarters
By Paul Lewis
My original cabin’s wobbly foundation shifted uneasily on its stacked-stone piers. “No problem,” I announced. “We’ll shore up this foundation, patch the roof and maybe add new Cedar siding.” A nice little weekend project, I thought. A couple of weeks later, up to my elbows in mud and blackflies, and surrounded by the remains of the demolished sleeping cabin, it occurred to me that this might be a bigger project than I had first imagined. As it turns out, nothing was salvageable. The good news is that constructing a small building from the ground up was high on the list of things I’d always wanted to do.

Parts the original cabin looked salvageable at first, but after close inspection of its wobbly footings and sagging structure, it clearly needed to be torn down. All of the new lumber had to come in by boat.
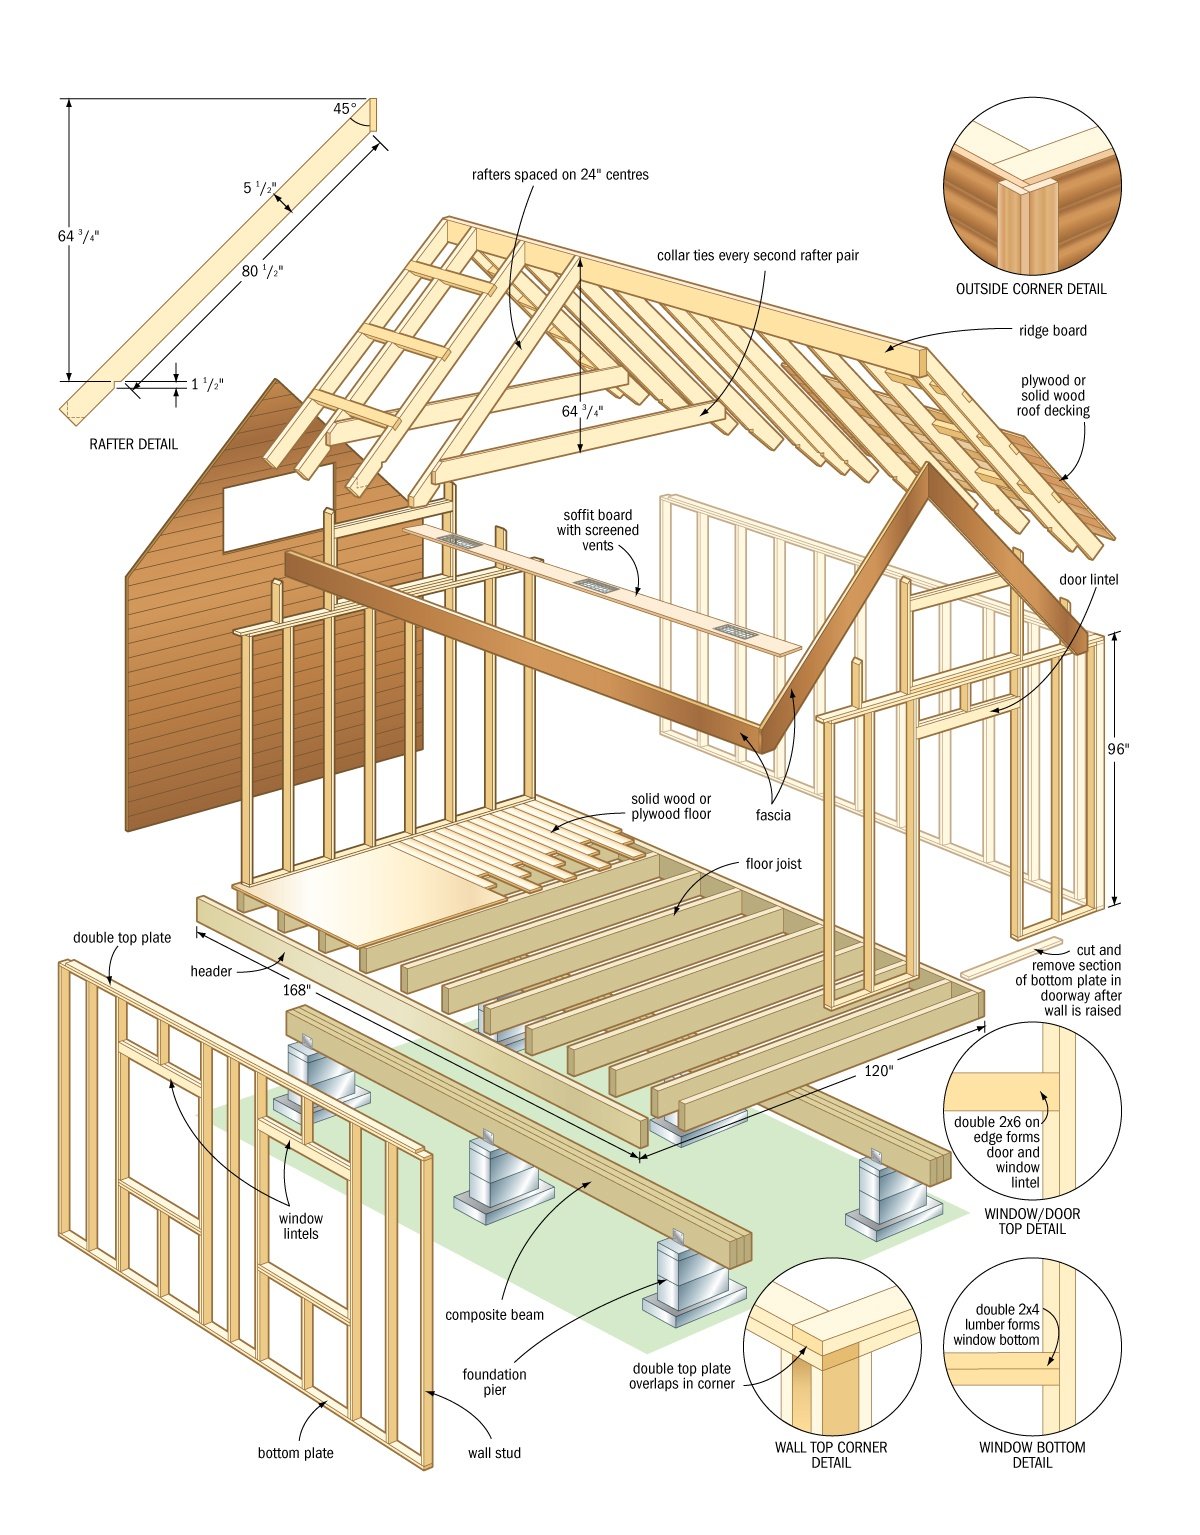
Plans and Permits
There are hundreds of DIY project plans available online. Just find one that suits your style and modify it to meet your needs. Don’t be too aggressive with modifications, though: designers have considerable experience figuring out the elements that come together to make the building look good. Even small changes in proportion can erase what you liked about the building in the first place. Whatever you do, don’t turn to those big-box pre-fab structures for inspiration. Those skimpy buildings are built for speed and economy and have little to do with good looks or longevity. Before starting work, contact a local building inspector to determine if you need a permit. Rules and regulations vary depending on location, but generally, anything less than 100 square feet doesn’t require a permit. Get a permit if it’s required. The fee is small and in my case, the inspector was very helpful with my questions and concerns. In addition, the exercise of putting together a set of permit-worthy plans shines light on potential problems before they become big headaches. The process will also help visualize how the finished building will rise out of a pile of lumber, and generate an accurate material list for determining costs and ordering materials.

To build on stone, Lewis poured concrete footings reinforced by rebar. The heights of the piers varied to create a level floor.
A Rock-Solid Foundation
The location for my building is unique: the concrete-block piers rest on solid bedrock, each at different levels. The front corner of the cabin is almost flush with the surrounding grade, while a rear back corner sits on a pier that is nearly 36” tall. Uneven ground requires special attention. After excavating down to solid rock, I built custom-contoured pier forms. To build the forms, make a plywood box the size of the footing and level it in place using short lengths of 1x2s spring-clamped to the form. Scribe the uneven contour of the rock to the plywood form box with a felt marker duct-taped to a scrap 1×2. Cut away the waste using a jigsaw so that form fits the rock perfectly. Before filling the forms with concrete, I drilled a couple of five-inch-deep holes in the rock using a rotary hammer with a masonry bit, and tapped 10” lengths of rebar home with a small sledgehammer. The rebar prevents the finished piers from moving laterally. Once the forms are filled with concrete and cured, stack concrete blocks on the top of each pier with 1⁄2” of mortar between each block, using a level to plumb the corner blocks every step of the way.

Once wall studs and rafters are in place, your structure is ready to fill in.
Beams, Joists, Floor Deck
When the mortar has cured, fill the voids in the blocks with more concrete and add the saddle brackets for the beams. Next, position the built-up beams in place and place the floor joists on top of the beams. Attach the rim joists using 3-1⁄2” galvanized framing nails. I fastened a sheet of plywood to the rim joist on just one side, using it to square up the assembly before nailing the joists to the beam. To fasten down the rest of the plywood floor, I ran a bead of construction adhesive along the top edge of each floor joist and then finished laying down the tongue-and-groove plywood floor, screwing it to the joists every eight inches.
Building the Walls
The finished floor deck makes a perfect surface to assemble the walls on. Get started by tacking a couple of scraps of 2×4 to the rim joists to make them extend up past the floor deck. These act as stops when assembling the walls. To build each wall, cut the top and bottom plate to length and marked the stud locations while holding the two pieces together. This ensures the studs line up perfectly as the wall went together. Next, I separated the plates, put the studs between them, nailing everything together with two 3-1⁄2” framing nails per joint. Frame the window and door openings with doubled 2x4s on edge, supported by “cripple studs” (shortened studs on either side of the opening). As I finished each wall, I had a friend help to tilt it into position. The scraps I nailed to the rim joist earlier helped to align the wall to the outside of the flooring deck. I nailed the wall in place with a pair of 3-1⁄2” nails driven down into the floor frame in each stud cavity, then plumbed the wall with a six-foot level and added temporary braces running diagonally from the wall to the rim joist. Once all four walls were up, I added a second top plate, overlapping the lumber at each corner for strength.

A loft level gives the cabin lots of storage space for guests’ gear. Note the smoke detector, a must-have in cabin for safety. Below, the cabin offers plenty of room for a bed and a place to chat away from the hum of mosquitoes. The interior walls were left without interior panelling. This warm rustic look called for keeping the fasteners well hidden, so they look tidy from the inside.
Framed-in-Place Roof
To maximize the storage space under the roof, I framed the roof in place with rafters instead of trusses. I raised the ridge board by tacking it to a couple of lengths of 2×4 and temporarily clamping it in place. Rafter angles are easy to determine on a 12:12 pitched roof. Just cut the end that meets the ridge at 45° and cut the rafter tail to 90°. A “bird’s mouth” notch is cut to fit the rafter tail onto the top plate of the wall. Once it fits correctly, use this rafter as a template for cutting the rest. To install the rafters safely, I laid a few 2x6s across the top plates of the walls to use as a temporary scaffold, then installed the rafters from one end to the other. When the walls are plumb and square, the identical rafters will ensure that the ridge board is perfectly centred on the building.

The continuous polyester roof vent overlaps the ridge. The roof vent is capped with single tabs of asphalt shingles.
Sheath, Vent and Shingles
Sheath the roof with ⅝” tongue-and-groove plywood, attached with ring-shanked nails. Install aluminum drip edges on the eaves and gable ends, followed by 20- lb. roofing felt from the eaves up to the ridge. I would have preferred to install cedar shakes on the bunkie roof, but ended up choosing three-tab asphalt shingles to match the other buildings on the propertyI set up scaffolding to reach the first courses of shingles without having to perch on the roof. After the first few courses, I installed a couple of roof jacks and a plank to complete the rest of the shingling. When the shingles were complete up to the ridge, I unrolled a continuous polyester roof vent out along the ridge and tacked it into position with roofing nails. The ridge cap shingles were cut from full size into thirds, with a taper on the non-exposed portion of the shingles. I bent these cap shingles over the ridge vent and secured them with roofing nails. These nails need to be longer to accommodate the additional thickness of the vent material. It’s smart to install the ridge cap shingles so that the overlapping edges face away from prevailing winds.
Cedar Siding
For me, nothing beats Western Red Cedar siding when it comes to cottage builds. If you can, purchase lengths of siding long enough to span the width and length of the building to eliminate any vertical seams. I used siding nails driven at an angle through the tongues, experimenting with the best nail location to have them high enough to be hidden by the grooves on the adjacent piece but low enough not to split the tongue or interfere with the interlocking tongue-and-groove. I worked from the bottom to the top, checking every few courses for level. Allow the siding to run long past the corners, and trim it off after all the siding is installed on each wall. Close in the space under the eaves with lengths of cedar ripped to width, then cap the corners with vertical pieces to hide the cut edges of the siding and seal out the weather.

Awning-style windows are a key element of the ventilation system. The design allows you to keep them open in a rain shower.
Windows and Doors
I chose off-the-shelf vinyl windows because they’re zero maintenance. While these don’t look as nice as wood-frame windows, they do have an integral brick-moulding that makes installing them a snap—just lay a bead of polyurethane sealant on the back edge of the brick mould and insert the window. Shim the window level and drive a few screws through each frame into the studs below. I did make the cedar awning-style windows that grace each gable end, however. These are cedar frames, rabbeted to accept a pane of glass held in place with glazing tape and retaining strips. The front door was from the demolished building, and its tiny window offered little light. To rescue the cabin from darkness, I added sidelights on each side of the door. I built these sidelights myself, by framing the narrow window openings when building the wall and adding a one-inch cedar frame all the way around. I nailed a stop close to the outside edge of the window the frame. I used glazing tape on the inside face of the stop, followed by a sheet of tempered glass held in place with another stop on the inside.
Front Deck
The small western red cedar deck that serves as the building’s front landing is built from 5⁄4 cedar deck boards laid on pressure-treated supports. To build it, I attached a ledger to the building with lag bolts, then sealed the joint with a strip of copper flashing. Because my deck rests on exposed sections of bedrock, I was able to cut short lengths of pressure-treated 4×4 to support the beams. Then I added the 5⁄4 deck boards on top, leaving 1⁄2” gaps between each board for drainage. The deck boards are scribed around the irregular rocks near the cabin for a unique look.

Summer breezes scented with cedar from the new cabin will make guests’ visits memorable. This one-room cabin was built on a water-access lot in Ontario’s Georgian Bay region.With the materials arriving by boat, compiling a complete materials list in advance was essential.
Finishing Touches
There’s no need to finish the cedar if you appreciate a silvery patina look after a year or two, but to keep the cedar looking as new as possible, you need to coat the building with some kind of finish. I applied two coats of Sikkens Cetol 1 to all exterior cedar surfaces, then caulked all exposed joints with polyurethane caulk. To complete the sleeping cabin, I added an industrial exterior-grade light fixture beside the front door and two outlets inside the cabin. The outlet nearest the bed location is split so that one receptacle can be on while the other is off. That way guests can operate a bedside lamp (which is on the top outlet), from the cabin entrance without cutting off the clock radio’s power. All the interior electrical runs are housed in rigid galvanized conduit. I could have used armoured cable for the exposed wiring, but the conduit looks better. Finally, I painted the plywood floor with two coats of good-quality porch and floor enamel, and added a plywood floor to the loft storage area. A simple shop-built cedar ladder provides access to the loft. Building a sleeping cabin may take a few weekends of work, but friends who want to visit your cottage can earn some time in the cabin by lending a hand in the construction process.