
Free plans for a stylish dockside storage bench


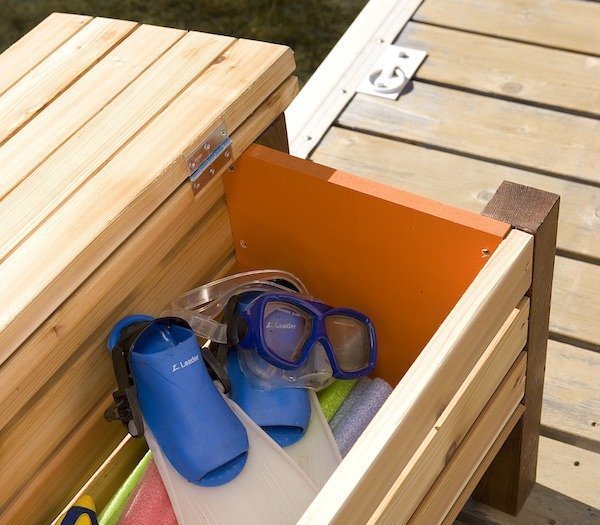
This basket bench has a design that is just the right length to fit a standard water noodle, and a slatted bottom to allow water to drain and air to circulate. Photos by Roger Yip
dockside doesn’t have to look like a garage sale
By Paul Lewis
Many of my projects are designed to store stuff neatly – and this one is no exception. Pool noodles (those ubiquitous foam tubes that multiply wherever there is water and kids) defy tidy storage. They are unruly, generally soggy and seemingly made to resist organization – until now. This basket bench has a design that is just the right length to fit a standard noodle, and a slatted bottom to allow water to drain and air to circulate. Guck doesn’t gather in the corners, either, because there are none. But this Western Red Cedar dock storage bench project is not just for noodles: paddles, life jackets, skis and tow ropes are just some of the water-related stuff that find a welcome home here. To top it all off, this project is also a comfortable bench, perfect for pausing and storage beside the pool or lake.
Fill up your bench and your dockside will start looking a little less like a garage sale and a little more like the relaxing retreat it’s meant to be.
Starting the Slats
The slats for the Western Red Cedar storage bench are cut from standard 5/4 deck boards and are designed for minimum waste. You’ll need five 12′ boards in all. Start work by cross cutting the deck boards in half for easier handling. Next, rip all the boards right down the middle, then reset your saw fence for a 2-1/2″-wide cut, keeping the freshly sawn square edges against the fence. This process removes all the factory-rounded edges from the boards as well as any cracks in board ends.
The next step may seem strange given that you’ve just removed all the rounded edges, but trust me, the effort is worth it. Set your tablesaw blade to 45° and adjust the fence so the blade knocks off the sharp edges of the slats. Run all long edges of the slats through the saw this way. These tiny bevels add a lot to the finished look of the project.
Seating Arrangement
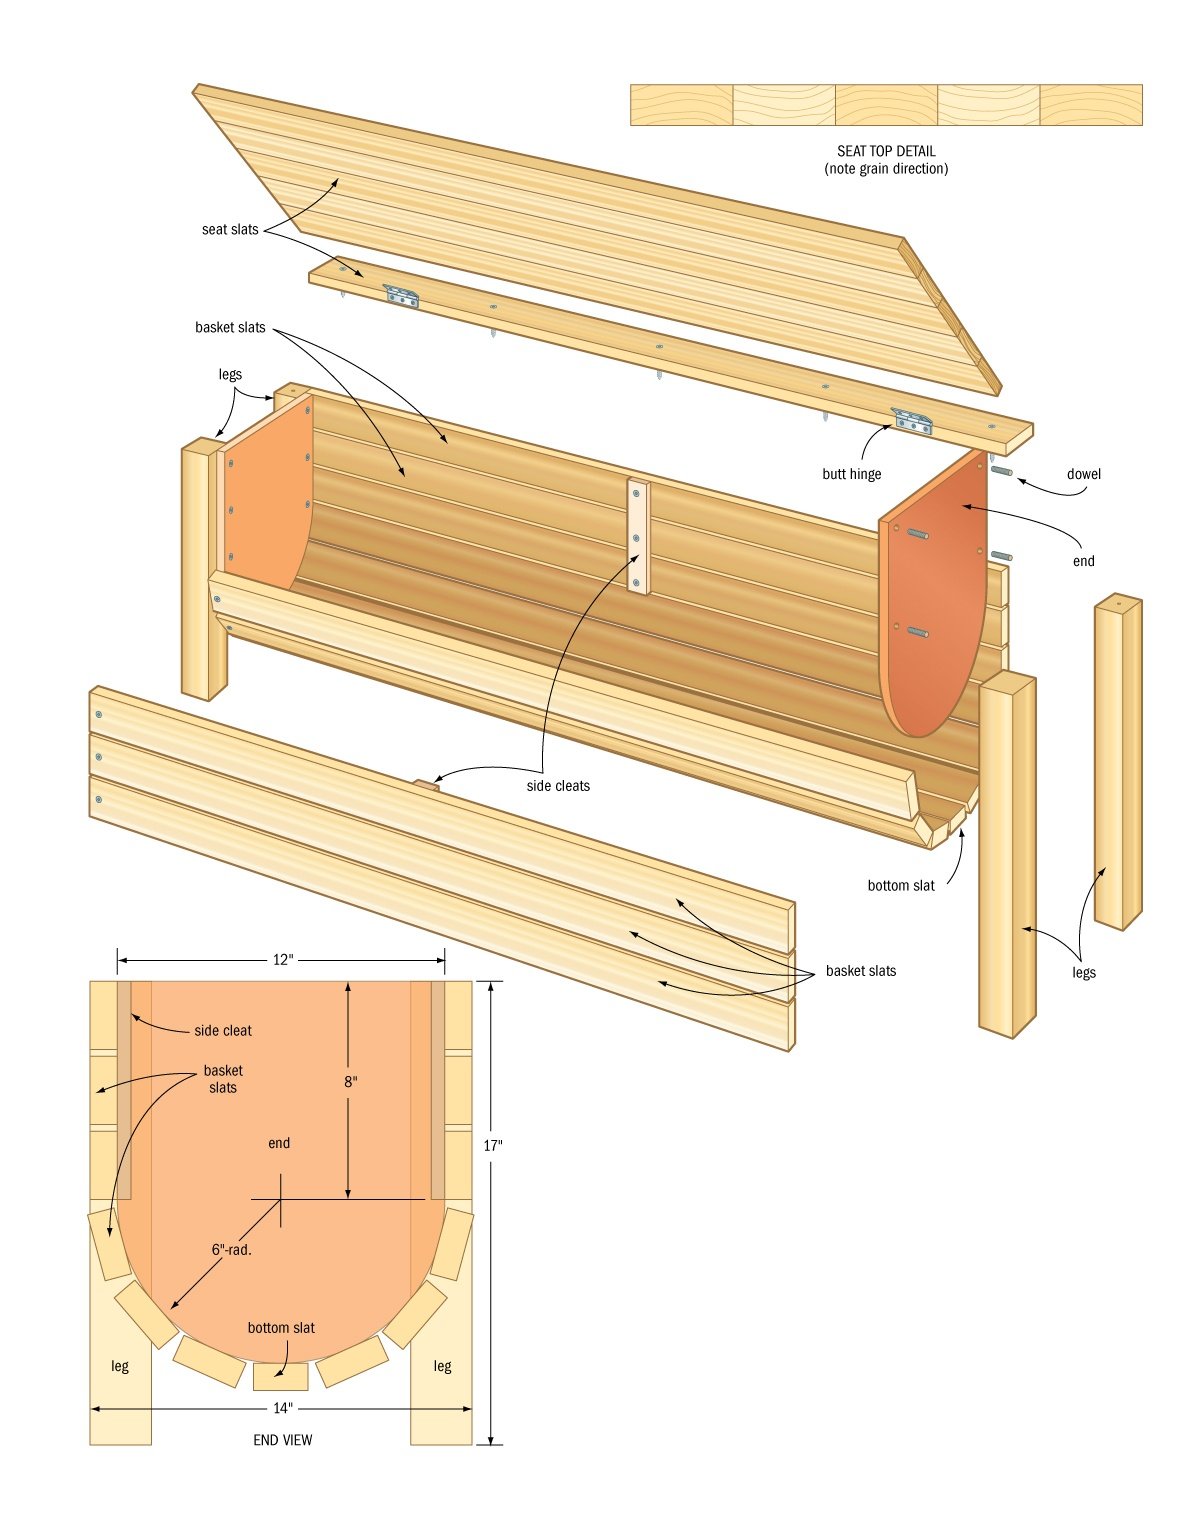
Choose the six nicest slats for the seat and arrange five of them on a flat surface for glue-up (the sixth piece stays separate to accommodate the hinges). Alternate the curve of the growth rings to minimize movement, then apply a weather-proof PVA glue to the edges of the slats. Draw them together using bar clamps and set aside to dry. There’s no need to joint the edges; the cedar is forgiving enough to join tightly. The small bevels on the edge of the slats hide any minor gaps if they do occur. Once the glue has set, cut the seat assembly and the loose slat to final length.
Paddles, life jackets, skis and tow ropes are just some of the water-related stuff that find a welcome home here, but dirt won’t gather in the corners because there are none.
Build a Basket
Cut the remaining 14 slats to final length for the sides, then toss the worst one of the bunch in the scrap bin; you only need 13 to complete the bench. Next, rip one slat to 2″ wide for use at the very bottom. This narrower width allows all the other slats to space out evenly around the curved ends. To complete the slats, drill pilot holes for screws that secure the slats to the end pieces. Drilling now instead of later ensures that holes are spaced precisely, giving the project a crisp, clean look when it’s done.
Four-legged Friend
The legs are milled from a single, 6′ length of 4×4. There is some waste here, but it’s necessary to get the 2-1/4″ dimension of the legs without laminating together thinner pieces. As with the slats, saw off factory-rounded edges to get crisp, square edges, then cross cut the legs to their final 17″ length. Identify the best-looking faces, then orient them to point outward in the finished project before drilling 1/2″-diameter holes, which will take the dowels that secure the legs to the end pieces.
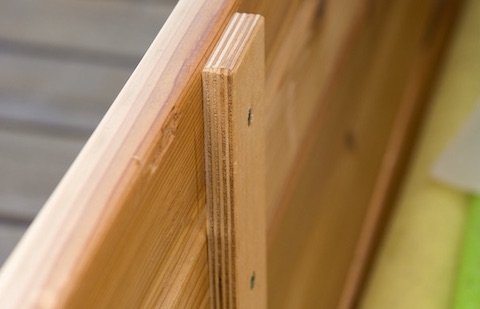
Outdoor-rated plywood cleats align and stiffen the front and back slats.
The Ends Are Near
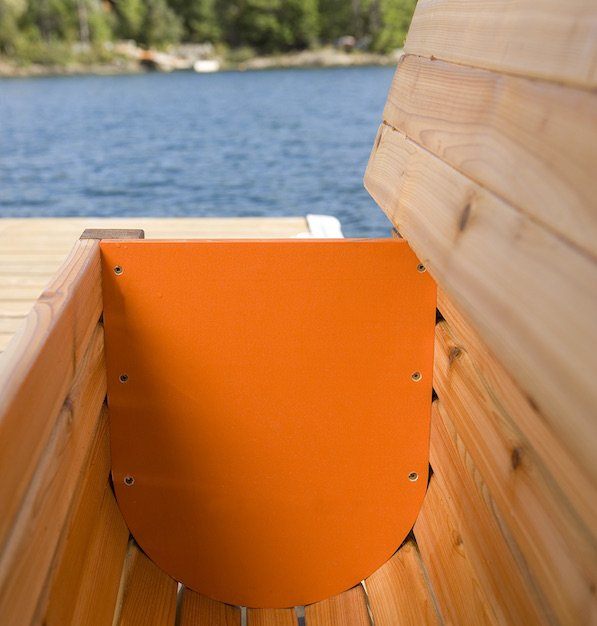
The rounded end pieces are made from 3/4″-thick exterior-grade plywood. Cut the pieces to their square dimensions first, then use a compass to lay out the circular ends. Cut the curve on a bandsaw, just leaving the pencil line, then smooth curves to their final shape using a stationary belt sander. To complete the ends prior to finishing, drill holes for the dowels on the outside faces.
Finish Before Assembly
I don’t usually apply finishes to outdoor projects before assembly, but the painted ends of this piece make it necessary. I applied a few coats of polymerized tung oil to all the Western Red Cedar parts. Before you apply it, mask all the areas that will get glue in the final assembly. This includes the bits on the inside faces of the side slats and the legs. Masking tape offers an easy way to keep these areas free of oil. The plywood ends get two coats of exterior-grade enamel paint. I used bright orange in tribute to those old, canvas life jackets, but you can choose any colour you wish. Dry-fit the legs to the ends to determine how to mask off the areas for no paint.
Finishing the Basket
With the paint and oil finishes dry and the masking tape removed, start assembling the bench by attaching the legs to the end pieces. Apply a Type II PVA glue to the dowels and mating faces and bring them together. Instead of clamping, I drove three #8 x 1 1/2″-long outdoor-rated screws through the inside of the end pieces at each leg. Drill pilot holes and countersink them before driving these screws in. Make sure they are positioned to avoid the dowels. Next, attach the side slats to the end pieces with more 1-1/2″-long screws. Start with the first slat at the top front of the bench and work your way toward the bottom. Use scraps of 1/4″-thick wood as spacers as you attach the slats to keep everything even. Leave the narrower bottom slat until last, in case it has to be adjusted to accommodate spacing variations.
Finishing Touches
To complete the Western Red Cedar bench seat, start by installing the hinges that attach the glued-up section to the single, loose seat slat. Measure and mark the location of the hinges, then cut shallow mortises to accept the leaves. Finally, attach the hinges using corrosion-proof screws. Next, apply glue to the tops of the back legs and the top edge of the back slat. Then position the seat assembly on top of the bench with an even amount of overhang at each end. Drill and countersink the holes for the screws and drive them home. Finally, install plywood side cleats with glue and screws on the inside faces of the first three front and back slats. Fill up your bench and your dockside will start looking a little less like a garage sale and a little more like the relaxing retreat it’s meant to be.
| Part | Material | Size (T x W x L*) | Qty. |
| Seat Slats | Cedar | 1” x 2-½” x 70” | 6 |
| Legs | Cedar | 2-¼” x 2-¼” x 17 | 4 |
| Basket Slats | Cedar | 1” x 2-½” x 63-½” | 12 |
| Bottom Slat | Cedar | 1” x 2” x 63-½” | 1 |
| Ends | MDO plywood | ¾” x 12” x 14” | 2 |
| Side Cleats | MDO plywood | ½” x 2” x 8” | 2 |
| Dowels | hardwood | ½” diameter x 1” | 8 |
| Hinges | galvanized | 2-½” | 3 |
*Length indicates grain direction