
Western Red Cedar Siding Pre-Installation Tips

Installation Tips Overview
Installing Western Red Cedar Siding doesn’t have to be difficult if proper instructions and procedures are followed properly. Below are some basic tips to help you get started with your next siding project! Click the image to the right to watch step-by-step instructions to installing Bevel, Tongue & Groove, Board & Batten or Shiplap siding.

Available from our Premium Retailers
In this section
Table of Contents

Fasteners
Recommended Fasteners
Hot-dipped galvanized, aluminum and stainless steel nails are all corrosion-resistant and can be used to nail Western Red Cedar. Other types of nails are not recommended. They can rust and disintegrate and react adversely with the natural preservative oils present in cedar resulting in stains and streaks. Copper nails also react with cedar and should not be used. Stainless steel nails are the best choice, especially if the siding is to be finished with transparent stain. Use No.304 stainless for general siding applications and No.316 for seacoast exposures.
Type, Size and Spacing
For best results use “splitless” siding nails. These have thin shanks and blunt points to reduce splitting. For greater holding power, nails with ring threaded or spiral threaded shanks are recommended. Nails with textured heads can be used to reduce glossy spots at the nails when finishing (see figure on right for nail types).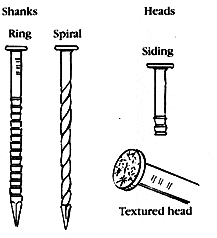
Nails should be driven with care. Heavy nailing distorts the wood and may cause splitting. At mitered corners, near edges and near ends, nail holes may need to be pre-drilled to avoid splitting.
The size of the nails to use depends on the type and thickness of siding. Good building practice is to use nails long enough to go through underlying materials, such as sheathing and insulation, and penetrate at least 1-1/4″ (32mm). See table below for recommended nail lengths for various thicknesses of siding.
Siding should be fastened to each stud or furring strip with nails spaced at a maximum of 24″ (61cm) on center, nail placement depends on the siding pattern and width. The key is to fasten the siding securely without preventing it from moving in response to the moisture content of the air. In general, each piece of siding must be nailed independently.
Important: Nailing overlapping pieces together restricts the natural movement of each piece and will cause splitting.
Minimum Recommended Nail Length
| Siding Type | Thickness (in.) | Thickness (mm) | Nail Size |
|---|---|---|---|
| Bevel | 1/2 or less | 13 mm or less | 2 (6d) |
| 5/8 | 16 mm | 2 (6d) | |
| 3/4 | 19 mm | 2-1/4 (7d) | |
| 7/8 & greater | 22 mm or greater | 3 (10d) | |
| Boards, Tongue & Groove, and Channel | 5/8 | 16 mm | 2 (6d) |
| 3/4 | 19 mm | 2 (6d) | |
| 7/8 | 22 mm | 2-1/4 (7d) | |
| Battens | 3/4 | 19 mm | 3 (10d) |
Wall Construction
Wall Construction
Like all siding materials, Western Red Cedar performs best when installed properly on a suitable frame. Cedar siding should be securely nailed to framing members, furring members or to blocking between framing members. Lumber sizes and spacing for blocking and furring are shown in the table below.
Stud Walls
Stud walls generally require no special preparation for horizontal siding installation. Siding should be nailed into studs at maximum 24″ (61cm) centers when applied over wood-based, solid sheathing and 16″ (41cm) on center when applied without sheathing. In those areas where an air space between siding and sheathing is desired, nail siding to furring strips.
For vertical siding installation, stud walls require horizontal blocking lines or furring strips. When applied over wood based sheathing, vertical siding should be nailed to horizontal blocking or other wood framing members not exceeding 36″ (91cm) on center when face nailed or 32″ (81cm) on center when blind nailed. When installed without sheathing, vertical siding should be nailed to wood framing or blocking members at 24″ (61mm) on center. Check your local code to verify requirements.
Masonry Walls
Masonry walls require furring strips for horizontal and vertical siding installation. Furring strips must be thick enough to allow for nail penetration of 1-1/2″ (38mm) into solid wood. Check your local code to verify requirements.
Lumber Size and Spacing for Blocking and Furring*
| Minimum Lumber Size (in.) | Minimum Lumber Size (mm) | Maximum Center Spacing (in.) | Maximum Center Spacing (cm) | |
|---|---|---|---|---|
| Blocking | 2 x 2 | 51 x 51 | 24 | 61 |
| Furring over Sheathing | 1 x 2 | 25 x 51 | 24 | 61 |
| Furring over masonry walls | 2 x 2 | 51 x 51 | 24 | 61 |
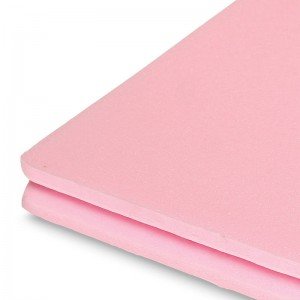
Rigid Foam Sheathing
Applying Siding Over Rigid Foam Sheathing
Rigid foam sheathing has an insulation value superior to that of traditional lumber and plywood sheathings. However, it has little or no nail holding power and using rigid foam sheathing as a nailing base for cedar siding is not recommended. For best results with rigid foam and other sheathing products, follow the nailing recommendations as to nail type, positioning, penetration and spacing. The table below provides nail length recommendations for siding and foam sheathing systems.
 Foam sheathing panels vary in moisture permeability but are generally considered as good moisture barriers. They should be used with a continuous film vapour retarder on the inside wall under the interior finish or with foil-backed gypsum board. Rigid foam sheathing can cause moisture to accumulate on the back of siding and cause staining, buckling and damage to finish coats. The following recommendations are meant to minimize potential problems when Cedar sidings are applied over rigid foam sheathing:
- Use thicker siding patterns in widths of 8″ (203 mm) or less. Thick, narrow siding is more stable than thinner, wider patterns and better able to resist dimensional changes.
- Use kiln-dried siding over rigid foam sheathing. This is the most stable cedar siding.
- Proper prefinish is essential. Follow the priming recommendations given in this publication before installing siding.
- Use light color finish coats to maximize heat reflection and reduce dimensional movement.
- In severe climates, an air space between siding and rigid foam sheathing can be created by fastening furring strips to the sheathing before installing siding (see Wall Construction). Air spaces allow for the venting of accumulated moisture.
- In all cases it is recommended that building paper or an equivalent building wrap be applied over the foam sheathing.
Recommended Minimum Nail Length for Siding Over Foam Sheathing
| Siding and Sheathing Thicknesses | Nail Length | |
|---|---|---|
| Inches | Millimeters | |
| 1/2″ (13 mm) siding and 1/2″ (13 mm) foam sheathing | 2-1/4 | 57 mm |
| 1/2″ (13 mm) siding and 3/4″ (19 mm) foam sheathing | 2-1/2 | 64 mm |
| 1/2″ (13mm) siding and 1″ (25mm) foam sheathing | 3 | 76 mm |
| 5/8″ (16mm) or 3/4″ (19mm) siding and 1/2″ (13mm) foam sheathing | 2-1/2 | 64 mm |
| 5/8″ (16mm) or 3/4″ (19mm) siding and 1″ (25mm) foam sheathing | 3 | 76 mm |
Moisture Control & Caulking
Controlling Moisture
High humidity output from washers, dryers, showers, kitchens and other sources, combined with today’s energy-efficient construction, can result in a build up of interior moisture vapor. This vapor migrates through the fabric of a building from the warm interior to the cold exterior, and when it condenses to water can cause structural damage to sidings and finishes.
Vapor barriers installed on the warm side of the wall prevent most of the migration of moisture vapor but they have disadvantages. Residual vapor must be allowed to escape to the outside. Building paper installed on the outside face of the sheathing helps prevent rain and snow from penetrating the walls and also allows the escape of moisture vapor.
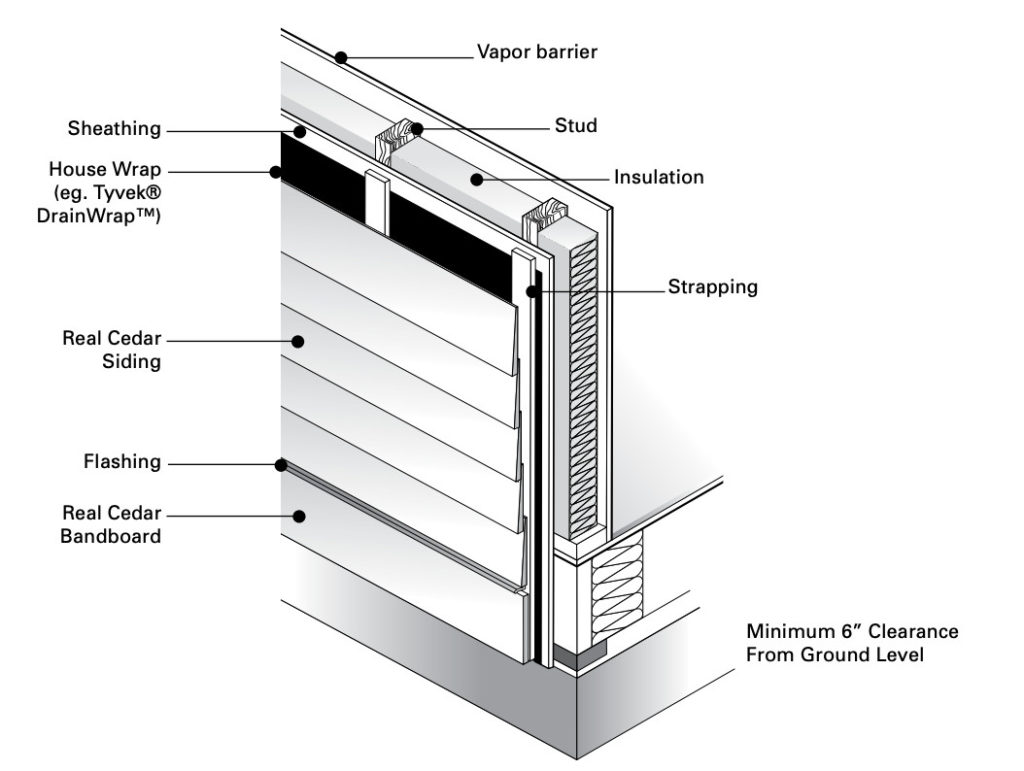
Proper wall construction includes the use of gas permeable paper and vapor barriers, such as DuPont™ Tyvek® DrainWrap™ (see diagram above). These are extremely effective in helping to prevent moisture problems. DuPont™ Tyvek® DrainWrap™ provides a building drainage system and weather barrier for areas that require maximum water drainage
Ground Clearance
Keep the lowest edge of siding at least 6″ off the ground and coat end grain at the bottom of vertical siding with water repellant.
Caulking
Thorough caulking of all joints is recommended including butt joints and where siding contacts openings or trim. Use only non-hardening caulks such as polyurethane, polysulfide or latex-silicone. Pure silicon caulks do not work well on cedar and are not recommended.
Do not reduce the siding overlap recommendations given in the installation sections of this publication. To do so could result in damage from wind-driven water.


